
Mauritius offers a rare chance to take underwater photos without getting wet, thanks to Blue Safari Mauritius‘ submarine tours. These 40–45 minute dives reach depths of 35 meters, providing clear views of marine life and shipwrecks through large portholes. With visibility often exceeding 30 meters, you can photograph vibrant coral reefs, over 100 fish species, and sights like the Star Hope shipwreck. To make the most of your dive:
- Choose the right camera: Full-frame models (e.g., Sony A1, Canon EOS R5) perform well in low light. Compact options like the Sony RX100 VII are budget-friendly alternatives.
- Use wide-angle or fisheye lenses: Ideal for capturing reefs and marine life close to the porthole.
- Adjust settings manually: Control ISO, aperture, and shutter speed for the best results in low light.
- Position yourself carefully: Avoid reflections by leaning against the glass and turning off your flash.
- Rely on natural sunlight: Midday lighting (11:00–14:00) works best at depths of 35 meters.
- Prepare gear beforehand: Check your camera, settings, and housing to avoid issues underwater.
Plan your visit between October and April for calm waters and book early to secure your spot. With patience and preparation, you can create stunning underwater shots during this one-of-a-kind experience.
Submarine Photography Camera Settings Guide for 35m Depths
1. Select the Right Camera and Housing
Choosing the right camera is crucial for capturing high-quality underwater photos. Cameras with larger sensors perform better in low-light conditions, which is essential when shooting at depths of up to 35 metres. Full-frame mirrorless models like the Sony A1 (6 500 €), Canon EOS R5 (3 900 €), and Nikon Z 7II (3 000 €) handle high ISO levels (up to 24 000) exceptionally well, making them ideal for environments where natural light fades quickly.
If you’re working within a budget, compact cameras such as the Sony RX100 VII, Canon G7X Mark III, or Olympus TG-6 still deliver excellent results. The most important feature to look for is the ability to shoot in RAW format, which retains all the sensor data, allowing you to recover colours and adjust exposure during post-production. This becomes particularly important in the controlled lighting conditions of a submarine cabin, where manual settings and RAW capture give you greater creative control. As Philip Medcalf from Alphamarine Photography explains:
"The more control over the settings of your camera you have the more you can choose how your images appear. Many shots in underwater photography are unachievable with a camera set on automatic".
These camera options also offer flexibility for transitioning between submarine photography and shallow-water activities.
Submarine Photography and Housing Considerations
During submarine tours, the pressurised cabin eliminates the risks posed by water and pressure, meaning waterproof housing isn’t necessary. For example, if you join a tour with Blue Safari Mauritius (https://blue-safari.com), you can shoot directly through the panoramic portholes using your standard camera. However, if you plan to extend your underwater adventures – for instance, with subscooter excursions that typically reach depths of 3 to 7 metres – you’ll need proper waterproof housing.
For broader use beyond submarine tours, investing in high-quality housing is a smart move. Premium aluminium housings from brands like Nauticam, Aquatica, or Sea & Sea (3 000 €–3 600 €) provide better ergonomics and come with built-in vacuum seals, outperforming budget-friendly plastic models from Ikelite or Seafrogs (starting at 470 €). Gerald Rambert, a celebrated underwater photographer, offers this advice:
"You need to first choose your underwater housing and the extra features that it can fit before you choose your camera".
When selecting housing, ensure it’s rated for depths of at least 40 metres. Proper maintenance is key – clean the O-rings before every dive and replace them every 1–2 years to ensure a secure seal.
sbb-itb-3563db6
2. Use Wide-Angle or Fisheye Lenses
Wide-angle and fisheye lenses are ideal for capturing expansive underwater scenes, even with the limited view through a submarine porthole. Fisheye lenses, in particular, offer an impressive field of view – often at least 180° – making them perfect for photographing large subjects like the Star Hope wreck or sprawling reefscapes. This wide perspective is especially useful at depths of around 35 metres, where natural light fades quickly during submarine tours.
These lenses also help minimise the distance between the camera and the subject, which significantly improves focus and reduces interference. To get the best results, position your lens as close to the porthole as possible. This reduces the amount of water and glass between the lens and the subject, enhancing contrast, clarity, and colour saturation. As Jim Decker, CEO of Backscatter Underwater Video and Photo, explains:
"By eliminating as much water as possible between the lens and subject, you will achieve better contrast and clarity, as well as more-effective light from your strobes."
Wide-angle lenses also naturally provide a large depth of field, ensuring sharp focus from the foreground all the way to distant reefs. For the sharpest images, focus on the nearest subject, as wide-angle lenses have more depth of field behind the focus point than in front of it.
Fisheye lenses add a unique touch with their curved distortion, which can emphasise central subjects while creating a dynamic periphery. Unlike on land, where this effect can feel distracting, underwater photography benefits from it. Josh Blank of Nature TTL points out:
"The underwater world has very few straight lines and, as a result, this [fisheye] effect is not nearly as distracting as it can be above water. In fact, it often helps create a more interesting and impactful composition."
High-quality fisheye lenses like the Canon 8-15 mm or Tokina 10-17 mm can focus sharply from just 15 centimetres away. This makes them perfect for "close-focus wide-angle" shots, where a marine animal fills the foreground while the surrounding environment remains visible. This technique shines during submarine tours, especially when curious fish or rays approach the portholes.
3. Adjust Camera Settings Manually
Shooting in a submarine at depths of around 35 metres presents unique lighting challenges. Natural light diminishes, and everything takes on a blue tint, making automatic camera settings less reliable in these conditions. Switching to manual mode gives you control over ISO, aperture, and shutter speed, allowing you to adapt to the tricky lighting and get better results.
As Carlo Piscioneri, Founder of Night Sky Pix, puts it:
"Auto mode is great for daytime images, but in low-light situations where the conditions can constantly change, you’ll need manual mode and adjust your settings for the specific situation."
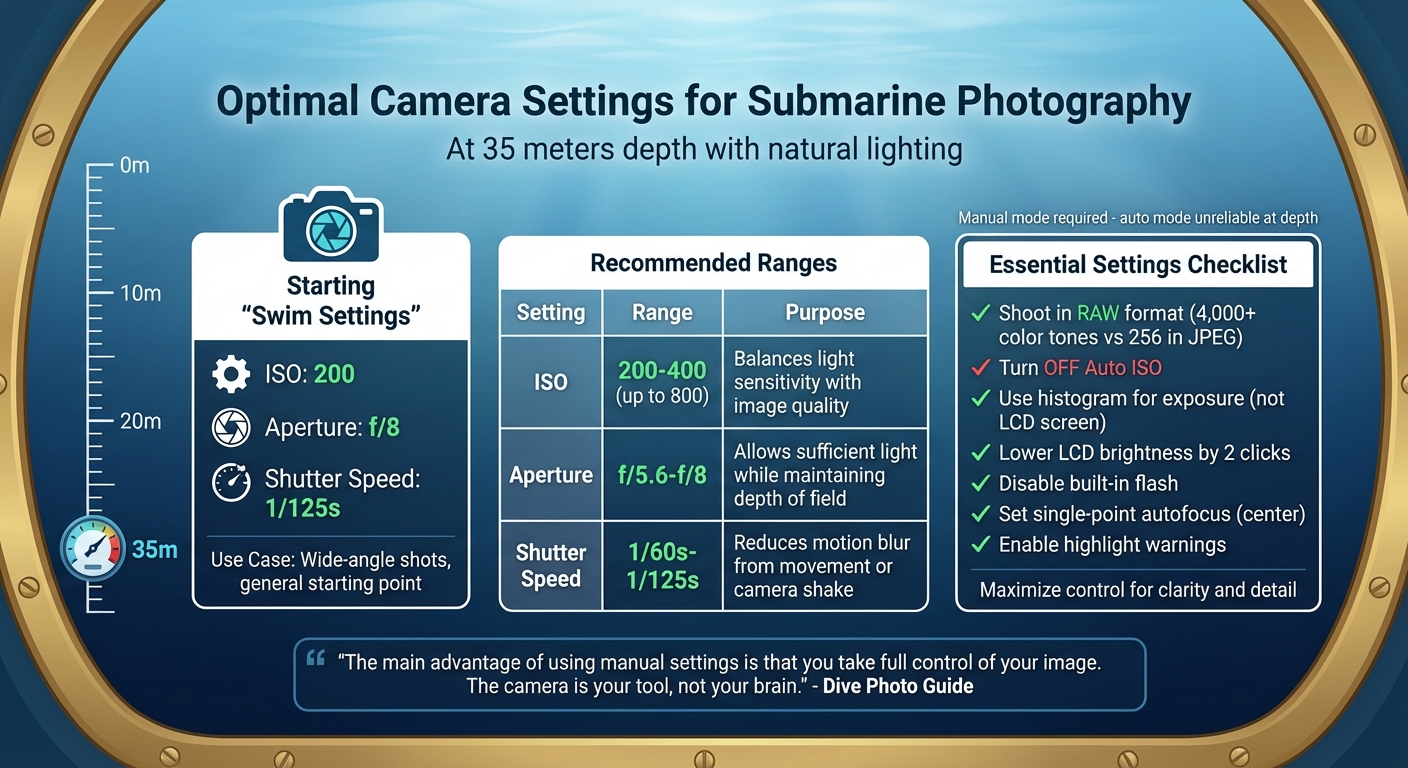
To start, use what are known as "swim settings": set your ISO to 200, aperture to f/8, and shutter speed to 1/125s for wide-angle shots. These are good starting points, but you’ll likely need to tweak them based on the light available. The table below provides some useful guidelines:
| Setting | Recommended Range | Purpose |
|---|---|---|
| ISO | 200–400 (up to 800) | Balances light sensitivity with image quality |
| Aperture | f/5.6–f/8 | Lets in enough light while keeping depth of field |
| Shutter Speed | 1/60s–1/125s | Reduces motion blur from movement or camera shake |
These settings help maintain consistent image quality, which is essential for capturing the fine details of marine life. Beyond adjusting these basics, there are additional steps to refine your shots.
For example, rely on your histogram instead of the camera’s LCD screen to judge exposure accurately. Lowering the screen’s brightness by two clicks can prevent you from overestimating how bright your images are. Also, turn off Auto ISO to ensure your manual settings aren’t overridden.
Dive Photo Guide sums it up well:
"The main advantage of using manual settings is that you take full control of your image. The camera is your tool, not your brain."
Lastly, always shoot in RAW format. RAW files capture over 4,000 colour tones compared to JPEG’s 256, giving you much more flexibility when correcting the blue tint or adjusting exposure during post-processing. This extra range is invaluable for submarine photography.
4. Position Yourself for Clear Porthole Views
After fine-tuning your camera settings, your physical positioning becomes the next key to capturing sharp, vibrant underwater shots. Luckily, on the BS1100 submarine, every seat is a window seat. With 10 individual portholes – five on each side – every passenger gets an unblocked view of the ocean floor. This layout ensures your photos won’t be hindered by obstructions.
To get the best results, how you position yourself at the porthole matters. Reflections from the cabin’s interior lighting can interfere with your shots, but there’s a simple fix. Lean against the glass and use your hands to shield the lens from reflections.
Travel blogger Angèle shares her experience:
"During the dive, I pressed my face against the porthole and cupped my hands around my eyes to block out the window frame. And just like that, I felt as if I were completely submerged with the fish."
Another tip: turn off your camera’s flash. The thick porthole glass can reflect the flash, ruining your shot.
If you’re seated near the front of the submarine, you’re in for a treat. You can take advantage of the pilot’s large panoramic windshield for a broader field of view. This perspective is especially handy when approaching highlights like the Star Hope shipwreck or intricate coral formations.
5. Use Natural Sunlight Through Portholes
Getting the lighting right is just as important as positioning your porthole when it comes to submarine photography. And underwater, natural sunlight is your best friend. Unlike on land, where photographers love the golden hour, the midday sun is ideal for taking clear underwater shots. Between 11:00 and 14:00, sunlight has the shortest distance to travel through the water, providing the brightest conditions for photography.
Why does this timing matter so much? Water absorbs light quickly, which means that the deeper you go, the less natural light you have to work with. Blue Safari Mauritius’ submarines operate at depths of 35 metres, so the midday sun becomes crucial for getting well-lit images.
Fantasea explains this perfectly:
"Noon offers the best lighting for underwater photography… it would be best to photograph during the time of day in which the light has the shortest distance to travel through the water till it reaches the lens of our camera. That would be when the sun is directly above us and between 11:00 AM and 2:00 PM."
To make the most of this natural lighting, position yourself so that the sun is behind you. This ensures your photos are evenly lit, avoiding harsh shadows, overexposed highlights, or silhouettes. As photography expert Jim Decker puts it:
"Shooting with the sun at your back will create a foreground scene with nice, even lighting."
6. Apply Artificial Lighting Sparingly
While natural sunlight is your best friend for submarine photography, artificial lighting can be a helpful tool – when used thoughtfully. It’s particularly useful for close-up shots, but overusing it can lead to backscatter. Backscatter occurs when light reflects off particles like sand, plankton, or silt in the water, creating distracting spots in your image. Professional photographer Michele Westmorland emphasizes this point:
"The farther your light source is from your lens, the fewer particulates you will illuminate".
Built-in flashes often cause issues by reflecting off the porthole glass. To avoid this, Suzan Meldonian recommends positioning external strobes behind the outer port:
"The key physical strobe placement should always be set back behind the plane of the outermost port, whether you are shooting macro or wide angle".
For better results, attach a diffuser to your lighting setup. Diffusers help spread light evenly, reducing harsh reflections and hot spots, particularly on shiny or reflective surfaces. They also tweak the colour temperature slightly – from 5,500K to around 5,000K – giving your photos a more natural appearance. As Meldonian explains:
"Diffusers soften and balance the strobe light being cast upon your subject, help distribute the light more evenly, and reduce the probability of hot spots from reflective creatures".
It’s worth noting that artificial light only works effectively within 1–2 metres of the porthole. Beyond that range, it mostly highlights particles in the water, increasing the risk of backscatter. So, while artificial lighting can bring out vibrant details, it’s just one part of the toolkit for capturing stunning underwater images during submarine adventures.
7. Prepare Your Gear Before Descent
Getting your gear ready before the submarine descends is essential – once you’re at 35 metres, making adjustments becomes almost impossible. Building on your earlier camera tweaks, set up what professional underwater photographer Brent Durand refers to as "swim settings." These are your go-to configurations for each dive:
"Swim settings are basic wide-angle or macro settings for your camera. These settings can be viewed as the starting point for exposing each image and should be reset before every dive so that you have a fresh starting point."
Start by ensuring your camera is set to RAW mode. This format captures more colour data, making it easier to adjust for depth-related blue hues later. Check that your ISO (200–400) and shutter speed (1/125s) align with the recommendations from Section 3.
Turn off your camera’s built-in AF illuminator to avoid unwanted reflections on the submarine’s porthole. Jim Decker from Scuba Diving Magazine explains it best:
"You don’t need to light up the inside of your housing [or cabin] with the built-in focus light of the camera."
Lower your LCD brightness by two clicks to prevent underexposure in the submarine’s dim interior. Use single-point autofocus (centre point) for quick and accurate focus on marine life, and set your metering mode to Evaluative or Matrix for balanced exposures. Enable histograms and highlight warnings on your playback screen to check exposure accuracy throughout the 40–45 minute dive. Extend your camera’s sleep timer to its maximum setting to avoid unexpected shutdowns mid-dive. These pre-dive preparations ensure you’re not caught off guard while underwater.
Finally, before sealing your camera housing, take a test shot. This step can save you from simple but frustrating mistakes, like leaving the lens cap on or forgetting a memory card. Brent Durand offers a valuable reminder:
"Every seasoned photographer knows that if you skip the test shot you will eventually find yourself underwater dealing with a silly mistake."
8. Shoot Wide for Close Marine Encounters
When a shark or a large grouper swims near the submarine’s porthole, your wide-angle lens becomes your best friend. Why? Because water, being 800 times denser than air, quickly reduces clarity the farther you are from your subject. The key is to get as close as possible to your subject, minimizing the water between your lens and the marine life.
Jim Decker, CEO of Backscatter Underwater Video and Photo, simplifies it with this advice:
"Anything that’s larger than a basketball should be considered a wide-angle subject."
A wide-angle lens with a field of view of 100–180° works best when you’re within 5 feet of your subject, ideally even closer – around 3 feet . The closer you get, the sharper and more vibrant your images will be. As Alert Diver magazine explains:
"To capture good colour and resolution, working close to the subject is necessary."
For the best results, prioritize focusing on the nearest element, which is usually the marine creature itself, rather than the background. This technique not only enhances depth of field but also ensures both the subject and any nearby reef details remain sharp. By combining this approach with the right settings and positioning, you can create stunning, layered compositions. Shooting wide for close encounters transforms your submarine photography into a visual storytelling experience.
9. Wait for the Right Moment
Timing is just as important as technical skill when it comes to capturing stunning underwater photos. In the serene, controlled environment of a submarine, the right moment can turn a good shot into a story worth telling. Marine life moves to its own rhythm, so patience is your best ally. Rushing toward a creature or immediately using your flash often leads to blurry, unfocused results. As Gerald Rambert, an award-winning underwater photographer, wisely said:
"Chasing fish was useless. You can only catch the tail! Learning what the fish like and do not like also made me more aware of their behaviour and body language."
The trick is to stay calm and still. When a marine animal, like a turtle or grouper, approaches the submarine’s porthole, resist the urge to move. Most species sense when you’re non-threatening and will naturally come closer. Photographer David Serradell emphasizes this approach:
"Getting the perfect underwater photo requires patience. You will have better chances to get the best results if you allow the animals to get close to you."
Pay attention to the animal’s behavior. Signs like sudden color changes, hiding, or quick movements can indicate stress. If you notice these, pause your photography and let the creature settle back into its natural routine. This approach not only improves your photos but also aligns with Blue Safari Mauritius’s commitment to minimizing human impact on coral reefs.
For optimal conditions, consider booking an early morning submarine tour. In Mauritius, marine life is especially active at sunrise, as many species gather near the reefs to feed. Observing patiently during these hours can reward you with vibrant, authentic moments that make your underwater shots truly memorable.
10. Check Equipment Before the Tour
A small oversight, like a grain of sand or a missing memory card, can derail your dive before it even begins. Building on the steps you took during your pre-dive gear setup, make sure every piece of equipment is in perfect condition before heading out. Did you know that most underwater housing leaks happen within the first few metres of descent? Before stepping aboard the Blue Safari Mauritius submarine, take the time to carefully inspect your gear.
Start with the O-ring – the slim rubber seal that keeps water from entering your housing. Remove it and check for any damage, like nicks or cuts. Even something as small as a hair or a bit of lint can compromise its effectiveness. As underwater photography expert Jeff Mullins puts it:
"O-Rings are very cheap in comparison to flooded cameras or strobes!"
Use a microfibre cloth to clean the O-ring groove thoroughly, and apply a light coat of silicone grease recommended by the manufacturer. The goal is to give it a slight shine, not to overdo it. If your housing has a vacuum system, activate it to ensure the seal is secure. This step wraps up your earlier equipment prep and sets the stage for a trouble-free dive.
Assemble your housing in an air-conditioned environment to avoid condensation issues. Add one or two fresh desiccant packs inside to keep moisture at bay. Before you head out, double-check that all latches and port locks are firmly secured. Avoid assembling your gear on the boat, where distractions can lead to mistakes. These simple but essential precautions will help you capture the breathtaking underwater world at depths of 35 metres without worrying about equipment malfunctions.
Conclusion
Submarine photography in Mauritius offers incredible opportunities for those who prepare well and exercise patience. By conducting proper equipment checks, mastering manual settings, and finding the best angles, a 40–45-minute dive to 35 meters can yield stunning images, especially with visibility often exceeding 30 meters.
Respect for marine life is essential to preserving these fragile ecosystems. Keeping a safe distance from marine creatures and avoiding any contact with corals ensures you can photograph subjects like octopuses, cuttlefish, and the residents of the Star Hope shipwreck without causing harm. Thanks to the submarine’s pressurized cabin, you can focus entirely on framing and timing, free from the physical challenges of traditional diving.
For a unique experience, Blue Safari Mauritius provides the only leisure submarine tours in the Indian Ocean. Their 10-seat BS1100 submarine offers every passenger an individual panoramic porthole, making it easy to take in the underwater scenery.
Early morning trips are ideal, as marine life tends to be most active at sunrise. To guarantee your spot, it’s best to book 24 to 48 hours in advance.
FAQs
Can I use my phone camera through the porthole?
Yes, you can take photos with your phone camera through the porthole during submarine tours in Mauritius. The submarines operated by Blue Safari Mauritius are pressurised and climate-controlled, offering individual portholes for an amazing view of the underwater world. Just make sure your phone is resistant to water and pressure, and always adhere to the safety guidelines shared during the tour.
What white balance should I use at 35 m depth?
At a depth of 35 m, it’s important to use a manual white balance to compensate for the loss of red and warmer tones in your images. For the best results, set a custom white balance using a reference object, such as a white or grey card. This helps ensure your underwater photos capture colours as accurately as possible.
How do I avoid reflections on the submarine window?
To cut down on reflections when photographing through a submarine window, start by making sure the glass is spotless and smudge-free. Position your camera at an angle rather than shooting straight on to avoid glare. Dimming or eliminating light sources behind you and avoiding flash directed at the glass are also effective tricks. These simple adjustments can enhance clarity and minimise distracting reflections in your underwater shots.